3 Phases of the Snow Alert Cycle
The snow alert system streamlines operations by notifying occupants linked to a contract about the imminent arrival of operators. This ensures a clear workspace, avoiding disruptions like parked cars or recycling bins obstructing the site. When used effectively, these alerts can save up to 1 hour per tractor per storm, enhancing operational efficiency and reducing associated costs.
These alerts improve operational efficiency, enhance customer satisfaction, and boost team productivity.
Phase 1 - Setup: Initial alert configuration at the company level and validation by the occupant.
1.1 Company-Side Configuration
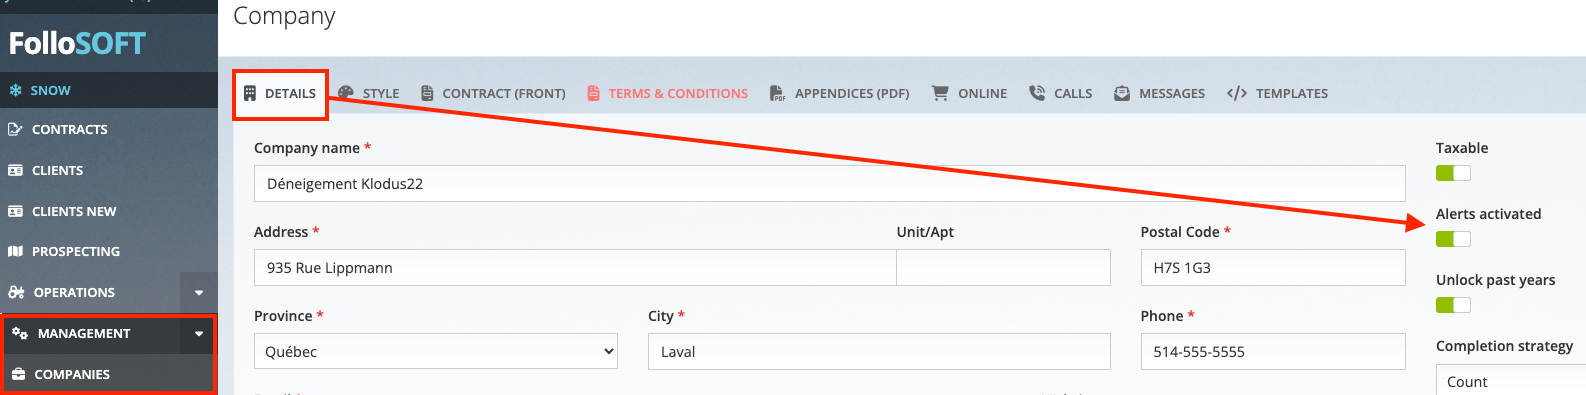
 Tip: Deactivate this option at the end of the season to avoid unnecessary fees.
 Include variables like
  Note: SMS costs depend on message length. Special characters increase costs. Base rate: $0.05/SMS, billed monthly for the previous month's usage.
Phase 2 - Sending Alerts (Operations)
Phase 3 - Post-Sending Validation: Verifying sent alerts for accurate tracking.
To verify sent alerts and address claims or issues reported by clients, use this tool to understand the flow of alerts on a specific route.
Displayed Information
Tips for Troubleshooting
If an alert was not sent:
Three Phases of the Snow Alert Cycle:
- Setup: Initial alert configuration at the company level and validation by the occupant.
- Alert Management: Sending alerts during snow removal operations.
- Post-Sending Validation: Verifying sent alerts for accurate tracking.
here are relevant articles for better understanding:
| Topics | Description | Article |
| Defining Alert Messages | Customize your snow alert messages or use the system’s default message. | [View Article] |
| Occupant Tab (Client Contract) | Activate client alerts and verify the number listed for alerts. | [View Article] |
| Logs Tab (Client Contract) | View the list of all alerts sent to the occupant. | [View Article] |
| Managing Alerts via the Operations Map | Learn how to send alerts using the operations map. | [View Article] |
| Managing Alerts via the Tablet | Learn how to send alerts using the tablet. | [View Article] |
| Inspection Tool | View all alerts sent by performing a search by number. | [View Article] |
Phase 1 - Setup: Initial alert configuration at the company level and validation by the occupant.
For alerts to function, two steps are required: setup by the operator and validation by the customer.
1.1 Company-Side Configuration
Activating Alerts:
- Go to Management > Company.
- Ensure the toggle button "Alerts Activated" is GREEN (default setting).
- Red Status: Alerts are deactivated for all customers.
Tip: Deactivate this option at the end of the season to avoid unnecessary fees.Customizing Alert Messages:
- Navigate to Management > Company, then to the 'Messages' tab at the top of the page.
- Configure SMS alert messages (alerts, validation/consent) or use default ones.
Include variables like $address (work address) and an opt-out option (Reply NO to unsubscribe).Note: SMS costs depend on message length. Special characters increase costs. Base rate: $0.05/SMS, billed monthly for the previous month's usage.Example:
- At the bottom of the page, select preconfigured templates for other messages (e.g., email, payment declined) under Management > Message Templates.
1.2 Occupant-Side Configuration
Alert Registration
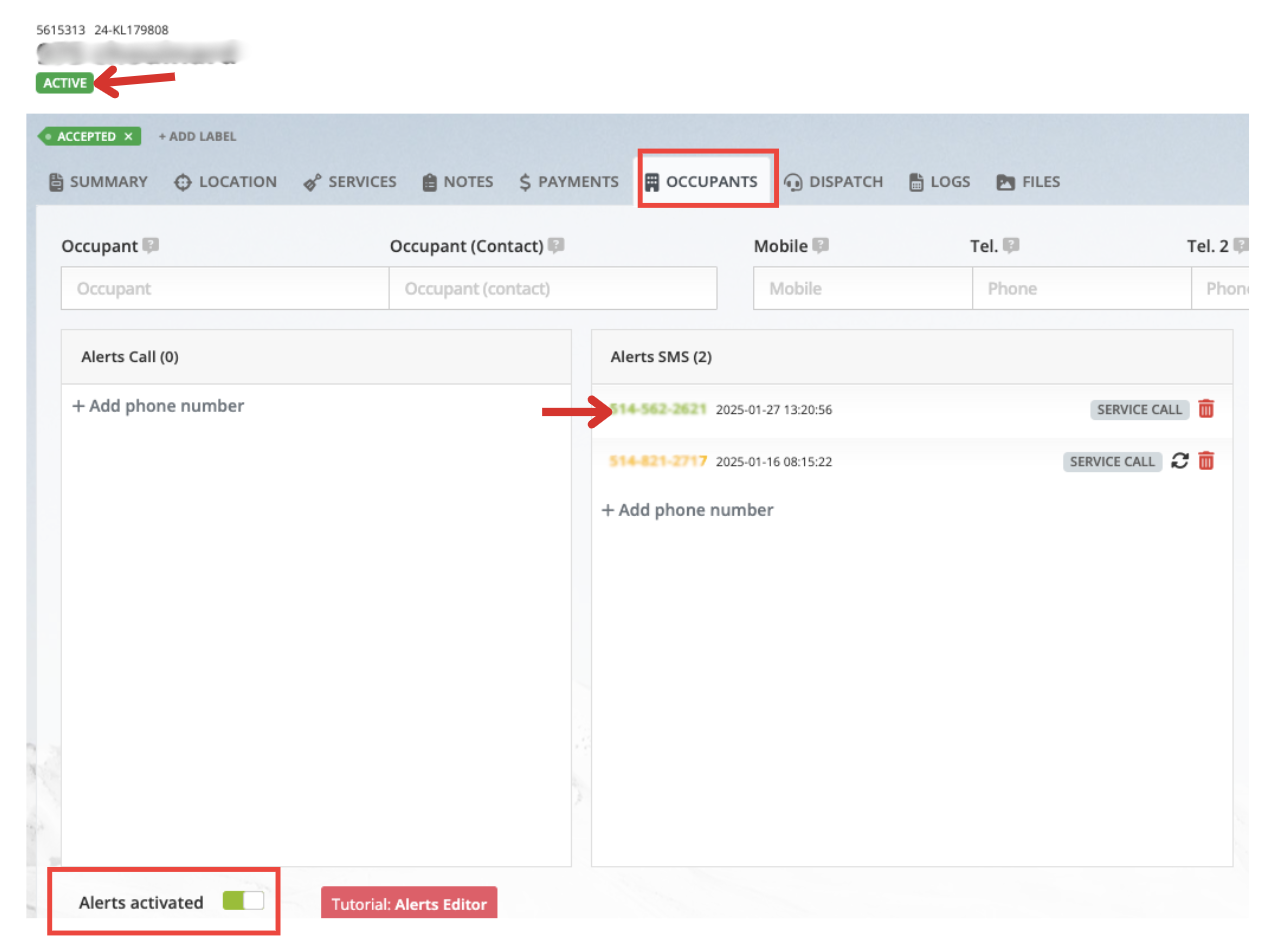
Through the client's contract, access the 'Occupants' tab. The following elements are essential to ensure the alerts are sent:
- Contract Requirements: The contract must be active, assigned to a route, and included in the route's tracing.
- Ensure the "Alerts Activated" toggle is GREEN (default setting).
- Two ways to add a phone number or email:
- By the occupant during online contract acceptance.
- Manually by you via the 'Occupants' tab.
For customers to receive alerts, this must absolutely be green (consent).
Alert Status Color Codes:
- Black: Subscription request sent.
- Yellow: Validation pending.
- Green: Validated, alerts activated.
- Red: Customer declined alerts.
- Dark Red: Customer unsubscribed.
Phase 2 - Sending Alerts (Operations)
Phase 3 - Post-Sending Validation: Verifying sent alerts for accurate tracking.
To verify sent alerts and address claims or issues reported by clients, use this tool to understand the flow of alerts on a specific route.
How to Use the Inspection Menu?
1. Go to Tools Menu > INnspection (alerts)
2. Search for alerts using:- Email address, phone number (without spaces, parentheses, or dashes), or contract number (add a # before the number).
- Select the date when the alert was sent (mandatory).

Displayed Information
Alert Details:
- Date, time, format (SMS, email, voice vall), and recipient.
- Route name and triggering parameters (buffer, direction)
Coordinate Status:
- Green: Validate coordinates, alert sent.
- Red: Coordinates deactivated or alerts declined
- Yellow: Unconfirmed registration
Received Alerts:
- List of sent alerts with the exact sending time
- Click on an laert to view the associated visit.
- List of sent alerts with the exact sending time
- Click on an laert to view the associated visit.
Tips for Troubleshooting
If an alert was not sent:
- Check the coordinate status in the 'Occupants Tab'.
- Ensure the "Alerts Activated" field is green.
Note: For technical reasons, unconfirmed voice calls (status in yellow) will still receive alerts, whereas other sending methods will not deliver alerts to contacts with a yellow status.
Note: For technical reasons, unconfirmed voice calls (status in yellow) will still receive alerts, whereas other sending methods will not deliver alerts to contacts with a yellow status.