Operations map
The operations map is the control center where you find the geographical position of contracts, routes and vehicles in operation. The map can also be used to trigger operations on routes, activate alerts and view the progress of operations.
The map can be accessed from the menu under Operations > Map. At the top right of the interface is a search engine for addresses, which allows you to identify a contract on the map with a target. You can adjust the appearance and content of the map using the options at top left. The globe icon displays a satellite image of the map; the "M" icon displays the image in the form of a geographical map. A drop-down list named "Companies" lets you select the company or companies for which contracts will be displayed on the map.
Below the icons are three selectors:
· "Traffic": shows traffic conditions in real time. Red means congestion, yellow means slow traffic and green is for smooth traffic.
· "Pickets”: stakes are markers added to delimit the location of operations. When the selector is green, the icon representing the contract will be accompanied by a drawing of a picket, with a small white X on a red circle to indicate that the contract has not been picketed. If only the image of the stake is displayed, the contract has already been staked.
· “Visits": identifies contracts visited during the specified period. When the selector is green, a slider determines the period to be considered. Places not visited during the selected period are illustrated by a red circle with a white cross associated with the icon representing the contract.
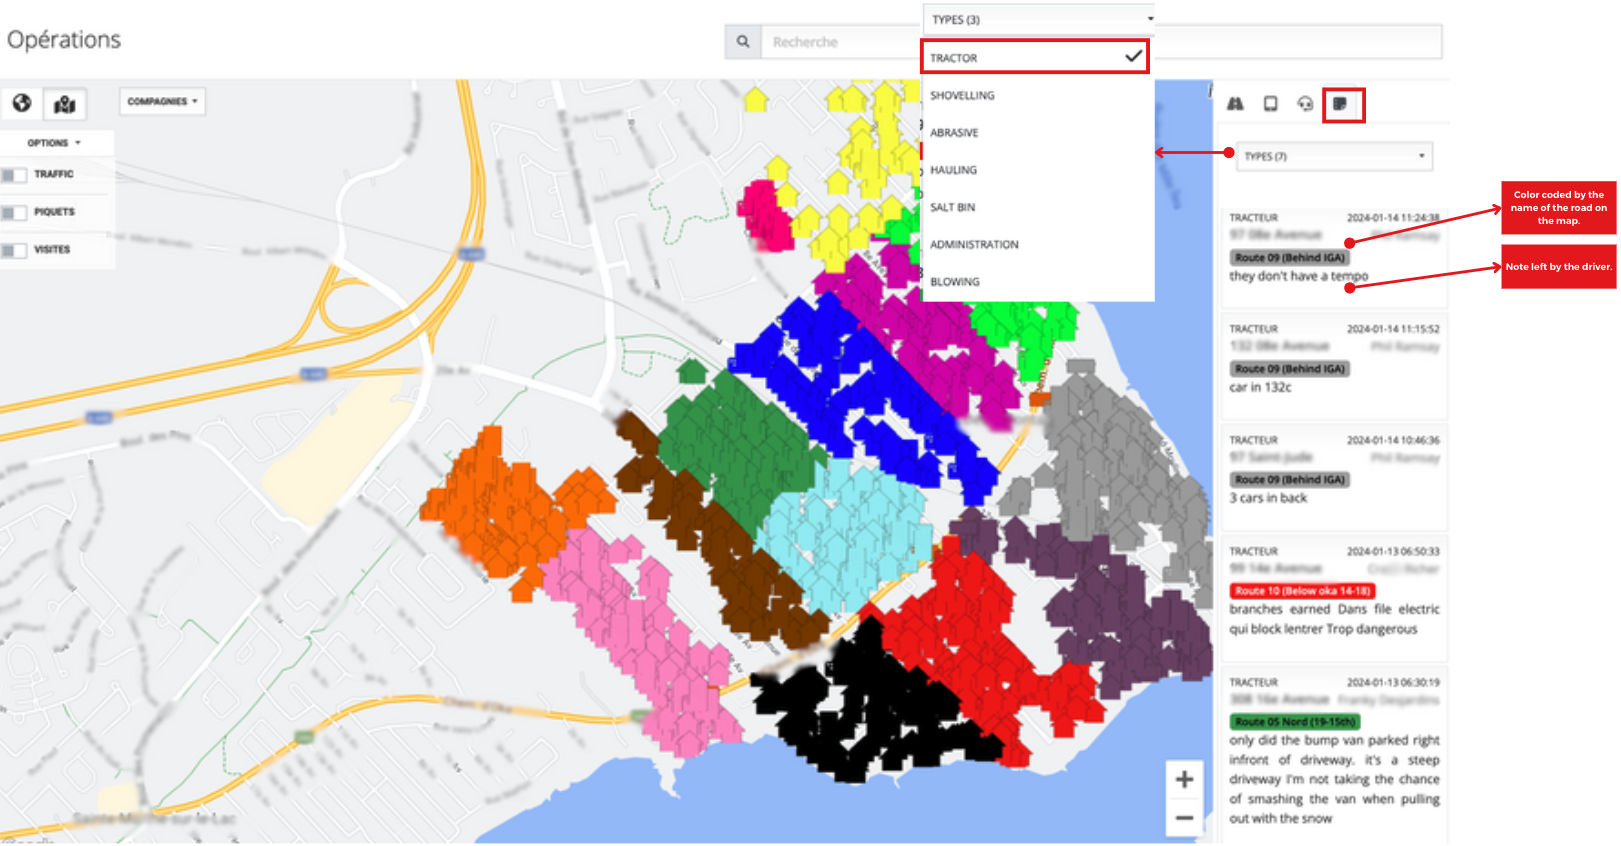
On the right of the map, the road icon displays all defined routes in the account. At the top of the list, a drop-down menu allows you to select the type of service desired. Only routes of this type and the contracts associated with them will be displayed. Each route name is preceded by a colored square, making it easier to identify contracts for the route. You can choose the desired color by pressing the square and then selecting a color which will be automatically saved.
Below the route name, a sight indicates the number of contracts associated with it. The "$" symbol totals the value of contracts assigned to this route. The distance of the route is shown in kilometers, and a flashing beacon icon is used to manage alerts. A yellow triangle with an exclamation mark sometime appears to the right of the route’s name to indicate the number of contracts assigned to the route that are not currently included in it. Finally, when operations are running on a route, you can view statistics on the evolution of operations as they progress.
The tablet icon shows the operators currently connected to their tablet, the time of connection, the type of service performed, and the route followed.
The headphone icon displays dispatches. The two drop-down menus allow you to designate the selection criteria for the dispatches to be displayed. For each dispatch, you can see the time it was created, the type of service to be performed and the route on which the contract is located.
Contracts on the card
For a contract to appear on the map, three elements are required:
1. The contract must have a service that corresponds to the type displayed on the map.
2. The contract must have a lot-type geocoding.
3. Contract status must be active.


Each eligible contract is represented on the map by an icon indicating its type. The numbers inside the icons indicate the contract's sequence number, i.e. its position in the order in which contracts will be carried out on the same route.
Contrat type | Icon |
Residential | |
Commercial | |
Multiplex | |
Postal box | |
Intersection | |
Fire hydrant | |
Bus stop | |
Institutional | |
Recreational |
Variants of these icons may sometimes be visible on the map to draw attention to them.
The contract is not associated with a route | |
The contract is associated with a route, but is not included in the route course | |
The number inside an icon represents the sequence number of the contract, i.e. its position in the order in which operations will be carried out on the same route. |
By clicking on the contract icon on the map, a window appears with a detailed summary. A series of images representing the various services is displayed. A black and white image indicates that this type of service is not included in the contract, while a color image means that at least one service of this type is included. Pressing on an image will display the services of that type. The drop-down list at the bottom of the window shows the route(s) to which the contract is assigned and allows to make changes. To view the entire contract, click on its address.
Create a route course (route tracing)
First select the route to be traced by pressing its name in the route list, then select the pencil icon. We recommend that you first create a rough course by following the streets where operations on this road will take place, and then return to include the contracts in the route.
Start the course by positioning the cursor at the desired starting point and double-click and move the cursor in the desired direction. To make a turn, click once at an intersection. A white circle appears at this point, enabling you to change direction. When you have reached the end of the course, double-click again. A traffic-light icon indicates the start of the course, and a checkered flag its end.
The next step is to refine the route so that it crosses the geocoding of all the contracts on the road. To do this, press and hold one of the white circles on the course to move it, which will reveal other white dots that can in turn be moved if required. Each contract must have a white dot within its geocoding to be included in the route. A contract without a white dot will not be visible to the operator on his tablet. To save, press the green disk.
Modify a route course
First select the road by pressing its name in the road list, then click the pencil icon. The map will show the route, starting with a traffic light and ending with a checkered flag.
To change the course, move the white circles along the route. Make sure there's a white circle inside each of the geocoding you want to include in the route. Once you've completed your changes, press the green disk to save the new route.
Deleting a route
First select the route by pressing its name in the list. Then press the eraser icon, next to the pencil.
Viewing Operator's notes
To view any note left by an operator on the tablet, two options are available:
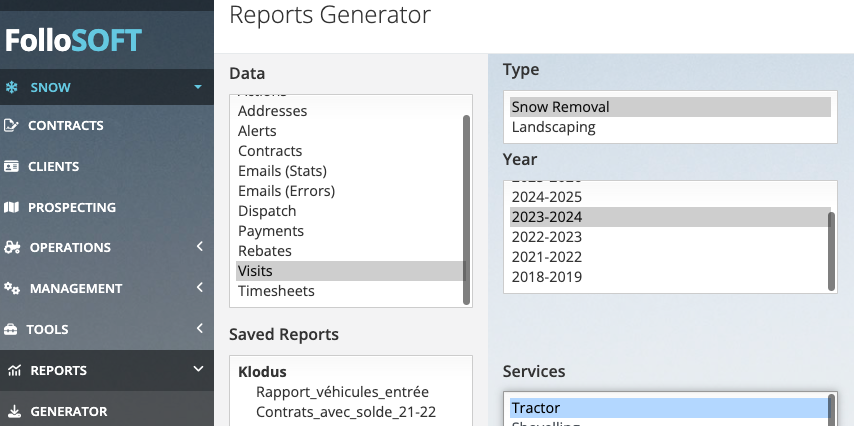
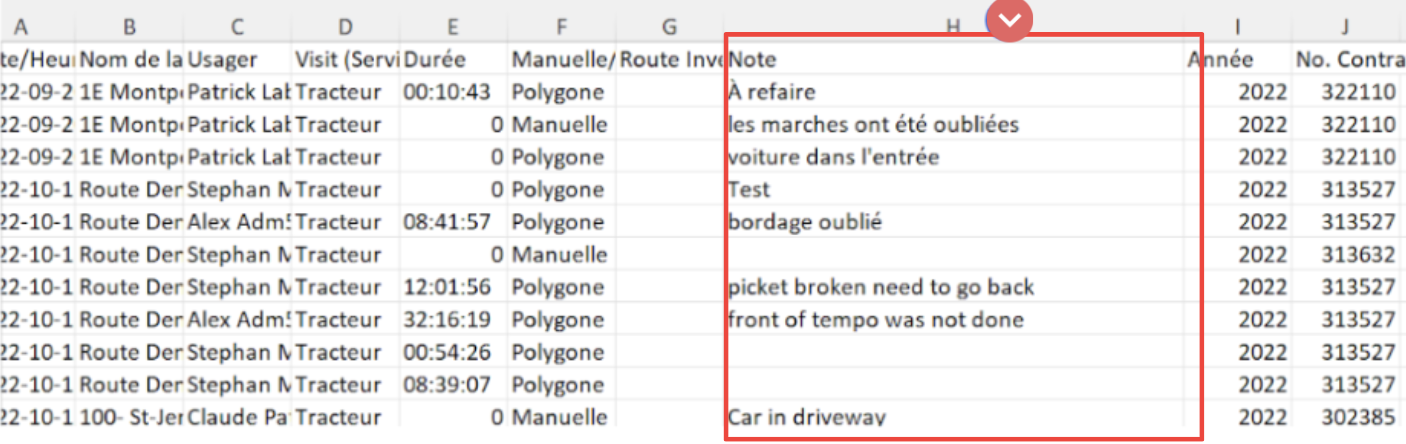
After exporting the file, you’ll find this information in the visit details, specifically under column H.
Related Articles
Batch Operations
This tool enables you to modify elements of several contracts simultaneously; their status, for example. To access this function, select Tools from the menu, then Batch Operations. A list of operations already carried out appears where you can see, ...4 conditions - Active contract
Conditions to be Met for a Contract to Appear on the Map The four conditions that must be met for a contract to be visible on the operations map are as follows: The contract status must be ACTIVE. A service and a price must be assigned to the ...Tractors icons are no longer visible on the map
If all of the sudden, the tractors icons are not visible anymore of the map, here's how to fix it. 1) First of all, if you open the map in a browser in Incognito mode, you should see all of your tractors icons. If that's the case, here's how to fix ...Prospection
The prospecting tool empowers you to visually target properties for quotation proposals. By accessing the tool, you can refer to the included geographical map to view your current contracts and identify areas that present the greatest advantage for ...Configuration
Configuration This tool allows you to configure the FolloSOFT application by setting default values, or by activating specific functions according to your needs. It can be found in the menu under Management > Config. Field Descriptions: Map Center - ...