Location
LOCATION TAB
The Location tab is dedicated to precisely defining the location where services will be rendered and characterizing the site.
Via the client's contract, access the "Location" tab
- Use the search tools to find the desired contract.
- Click on its address to open the contract details.
- Finally, go to the second tab.
Definition Process:
The definition process starts with the fields at the top of the window.
Fields to Fill:
Location Details - The first part at the top of the window:
- Location: Address, City, Postal Code, Province, and Type of location.
- Parking Details: Area, Width, number of parking spaces, surface materials, Slope, and Additional.
- Property Details: Sidewalk Area and information about the carport.
Save Button:
The Save button at the bottom of the screen allows you to retain the information entered in the different fields.
Geocoding - The second part of the window
This involves geocoding the location, which allows delineating the regions of the property where operations will occur.
This section is divided into three parts:
- Zones.
- Satellite map.
- Street view.
Zones:
The first column displays different zones (geocodings) created, including Terrain, Parking, Sidewalk, Building, and Lawn.
Terrain geocoding delimits the entire property where services under the contract are provided. It informs the FolloTrack application, triggering the visit procedure upon the operator entering the client's property. To expedite the process, extend Terrain geocoding to the middle of the street in front of the property, making it mandatory and unique.
Other geocoding types (Parking, Sidewalk, Building, and Lawn) establish the area of different zones useful in the Services tab, recommending meticulous tracing for precision.
How to Trace Geocoding:
Create a new geocoding by clicking "Add" in the first column.
- Press the drop-down list to choose the desired type.
- Enter the name in the field below.
- Press the green floppy disk to save.
- Click on the pencil icon of the desired zone, move the cursor over the satellite map, click once to anchor, and then outline the shape by clicking around the zone. To end, click the first point added (anchor point).
Modify characteristics by pressing the zone name. For existing geocoding, click the pencil icon associated, adjust points for shape modification, and save the changes.

Recommendation:
Extend geocoding to the middle of the street for efficient visit recording once snow is cleared by operator.
Deleting a Zone:
Click on the red trash bin icon to delete the zone.
Creating Multiple Zones:
Click "Add" and select the zone to geocode. For instance, use the SIDEWALK filter to define a bordering zone.
Note: Only the Terrain-type zone is considered by the tablet; others help determine property area for contract cost.
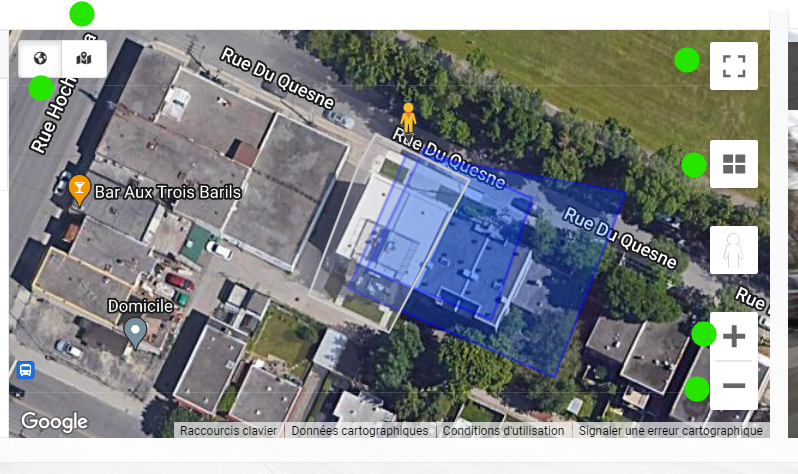
Satellite Map:
The map has several features accessible via icons.
Map Display Icons:
- Satellite Image
- Geographic Map
- Full-Screen Mode
- Map Tilt
- Pegman Control
- Zoom Level Control


Related Articles
Prospection
The prospecting tool empowers you to visually target properties for quotation proposals. By accessing the tool, you can refer to the included geographical map to view your current contracts and identify areas that present the greatest advantage for ...Pricing Chart
This tool allows you to set default amounts for services offered by companies under the same account. Access the sub-menu You can access this page by clicking on Management menu > Pricing Chart 1 : Select criteria Choose the company for which you ...Summary
SUMMARY TAB Via the client's contract, access the "Occupant" tab. The Summary tab allows you to access important information about the contract, such as billing details and key dates. Internal No.: Internal contract number, in case you have an ...---- Upload PDF
This tab allows you to upload a PDF file that will be appended to your contract. The PDF can contain a letter to your clients, advertisements for other services provided by your company, a new service offer, or the terms and conditions of your ...Devices
Management - Devices This is a tool for managing tablets assigned to an account. To access it, select Devices under Management. A page containing all the devices linked to the account appears. The search engine allows you to search by IMEI number. ...